本地部署 AI作画工具 stable-diffusion-webui 多种模型 可生成NSFW

AI作画最近非常火热啊,本文是在使用N卡的电脑上,本地部署stable-diffusion-webui前端+替换默认的模型,实现生成高质量的二次元图像,并且可以不受限制的生成图片(在线版一般会阻止NSFW内容生成)。
- AI绘画系列文章之一:本地部署 AI作画工具 stable diffusion webui 多种模型 可生成NSFW
- AI绘画系列文章之二:AI绘画指南 stable diffusion webui (SD webui)如何设置与使用
- AI绘画系列文章之三:AI作画工具 stable diffusion webui 一键安装工具(A1111-Web-UI-Installer)
- AI绘画系列文章之四:AI 绘画与作画 stable diffusion webui 常见模型汇总及简介
所需资源下载位置:
Git:https://git-scm.com/download
CUDA:https://developer.nvidia.com/cuda-toolkit-archive
Python3.10.6:https://www.python.org/downloads/release/python-3106/
waifu-diffusion:https://huggingface.co/hakurei/waifu-diffusion
waifu-diffusion-v1-3:https://huggingface.co/hakurei/waifu-diffusion-v1-3
stable-diffusion-v-1-4-original: https://huggingface.co/CompVis/stable-diffusion-v-1-4-original
stable-diffusion-v-1-5: https://huggingface.co/runwayml/stable-diffusion-v1-5
stable-diffusion-webui:https://github.com/AUTOMATIC1111/stable-diffusion-webui
NovelAILeaks 4chan:https://pub-2fdef7a2969f43289c42ac5ae3412fd4.r2.dev/naifu.tar
NovelAILeaks animefull-latest:https://pub-2fdef7a2969f43289c42ac5ae3412fd4.r2.dev/animefull-latest.tar
[toc]
开始
首先请确定你有基本的理解能力和动手能力,基本的网络搜索检索信息的能力。过于基础的东西比如“什么是命令行”,“如何下载文件”,“magnet是什么东西”,“满屏英语看不懂”,“怎么给Python,Git加上魔法上网”等等这些过于基础的问题,我这里无法做出说明,也不会解答。
要顺利运行 stable-diffusion-webui与模型,
需要足够大的显存,最低配置4GB显存,基本配置6GB显存,推荐配置12GB显存。
当然内存也不能太小,最好大于16GB。
显存大小决定了你能生成的图片尺寸,一般而言图片尺寸越大,AI能发挥的地方越多,画面里填充的细节就越多。
GPU主频和显存位宽,则决定了你能生成的多快。
当显存不足时,只能用时间换性能,将生成时间延长4倍,甚至8~10倍来生成同样的图片。
教程部署环境为
CPU:Intel® Core™ i7-10750H
GPU:NVIDIA Quadro T2000 with Max-Q Design (显存4GB)
内存:16GB * 4
磁盘:1TB * 2 SSD
OS:win11 21H1
准备运行环境
需要准备3个或4个东西
Python 3.10.6,Git ,CUDA,这三个的下载地址在文章的最前边。
视情况,你可能还需要一个魔法上网工具(假设你的魔法上网工具代理在127.0.0.1:6808)
安装 Python 3.10.6 与 pip
请一定安装3.10.6版本的Python,其他版本高几率无法运行
请一定安装3.10.6版本的Python,其他版本高几率无法运行
请一定安装3.10.6版本的Python,其他版本高几率无法运行
我这里采用直接系统内安装Python 3.10.6的方式
如果你会用Miniconda,也可以用Miniconda实现Python多版本切换,具体我这里不教需要的自己琢磨。
- 访问 Python3.10.6 下载页面
-
把页面拉到底,找到【Windows installer (64-bit)】点击下载
-
安装是注意,到这一步,需要如下图这样勾选 Add Python to PATH
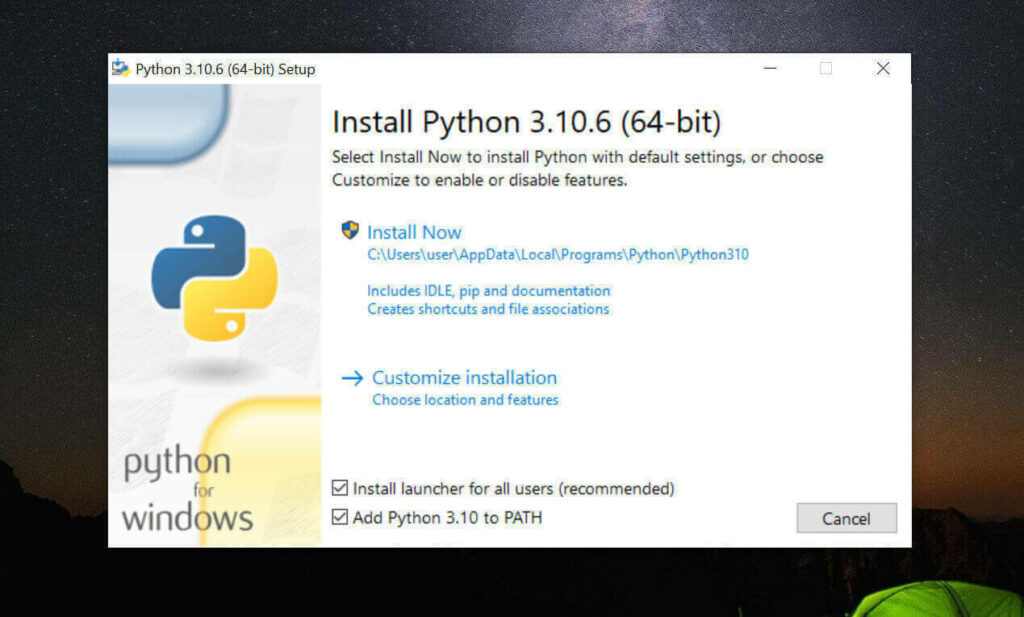
然后再点上边的 Install Now
python -
安装完成后,命令行里输入
Python -V,如果返回Python 3.10.6那就是成功安装了。 -
命令行里输入
python -m pip install --upgrade pip安装升级pip到最新版。
请一定安装3.10.6版本的Python,其他版本高几率无法运行
请一定安装3.10.6版本的Python,其他版本高几率无法运行
请一定安装3.10.6版本的Python,其他版本高几率无法运行
安装 Git
- 访问 Git 下载页面
-
点击【Download for Windows】,【64-bit Git for Windows Setup】点击下载
-
一路下一步安装
-
命令行运行
git --version,返回git version 2.XX.0.windows.1就是安装成功了。
安装 CUDA (nvidia显卡用户)
-
命令行运行
nvidia-smi,看下自己显卡支持的 CUDA版本
(升级显卡驱动有可能会让你支持更高版本的 CUDA)
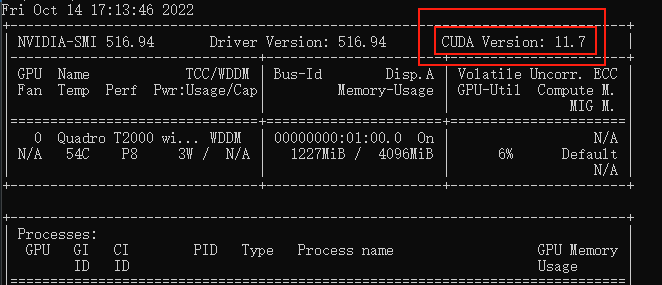
-
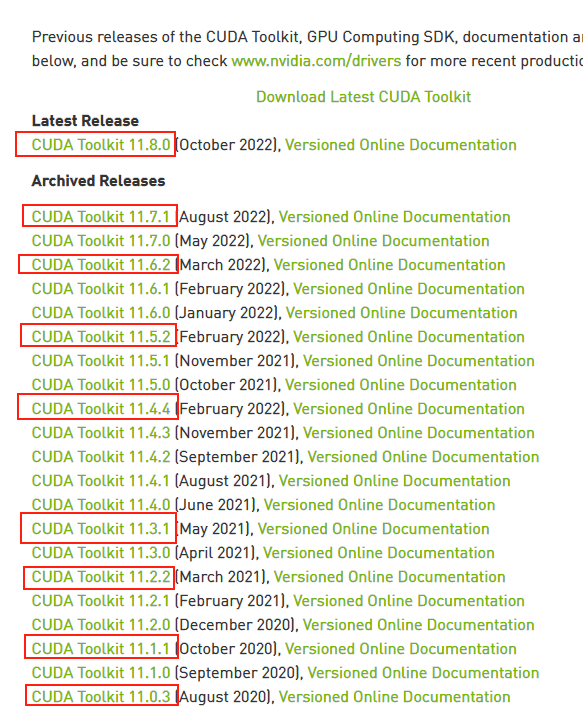
接下来前往英伟达 CUDA 官网,下载对应版本。
注意请下载,你对应的版本号最高的版本,比如我的是11.7的,那就下11.7.1(这里最后的.1意思是,11.7版本的1号升级版)
-
选你自己的操作系统版本,注意下个离线安装包【exe [local]】,在线安装的话,速度还是比较堪忧的。

下载stable-diffusion-webui (nvidia显卡用户)
找一个你喜欢的目录,在资源管理器,地址栏里敲CMD,敲回车,启动命令提示行窗口,输入以下命令
# 下载项目源代码
git clone https://github.com/AUTOMATIC1111/stable-diffusion-webui.git
# 切换到项目根目录
cd stable-diffusion-webui
- 他会在你选择的目录下生成stable-diffusion-webui文件夹,放项目
- 这东西本体+虚拟环境+集中模型+增强脚本最后会很大的,目前我已经占用了快20GB了,请放到磁盘空间富裕的盘符
- 整个路径中,不要有中文(比如“C:\AI作画工具\”),也不要有空格(比如“C:\Program Files”)可以避免很多奇怪的问题。
下载stable-diffusion-webui (AMD 显卡用户)
这是AMD显卡用户的步骤,nvidia显卡用户可以略过,stable-diffusion-webui尚未正式支持AMD,目前是 lshqqytiger 大佬制作的分支版(stable-diffusion-webui-directml),Training功能AMD用户无法使用,也就是无法训练,但其他功能比如文字生成图,图生图,重绘,扩展,LoRAs等都可以正常工作。
找一个你喜欢的目录,在资源管理器,地址栏里敲CMD,敲回车,启动命令提示行窗口,输入以下命令
# 下载项目源代码并安装
git clone https://github.com/lshqqytiger/stable-diffusion-webui-directml && cd stable-diffusion-webui-directml && git submodule init && git submodule update
下载模型文件
stable-diffusion-webui只是个工具,他需要后端的训练模型来让AI参考建模。
目前比较主流的模型有
- stable-diffusion:偏真人(一般简称为 SD 模型, SDwebui 模型)
- waifu-diffusion:偏向二次元(一般简称 Waifu 模型,WD模型)
- Novel-AI-Leaks:更加偏向二次元(一般简称 Naifu 模型)
模型文件一般都比较大,请找个空间富裕的磁盘下载。
更多模型下载可以看下这个:《AI 绘画与作画 常见模型汇总及简介》
模型的大致区别
| 名称 | 需求 | 效果 | 备注 |
|---|---|---|---|
| stable-diffusion (4GB emaonly模型) | 2GB 显存起步 | 出图速度 10s,单次最大出 920×920 | 适合出图用 |
| stable-diffusion (7GB full ema模型) | 4GB 显存起步 | 带最后一次训练的权重,所以费显存 | 适合训练用 |
| waifu (Float 16 EMA 模型) | 2GB显存起步 | 与stable性能接近 ,显存占用略高 | 适合出图用 |
| waifu (Float 32 EMA 模型) | 2GB显存起步 | 与stable性能接近,显存占用略高 | 适合出图用,出图质量其实和16差别不大 |
| waifu (Float 32 Full 模型) | 4GB显存起步 | 与stable性能接近,显存占用略高 | 适合出图或训练用 |
| waifu (Float 32 Full + Optimizer 模型) | 8GB显存起步 | 与stable性能接近,显存占用略高 | 适合训练用 |
| Naifu (4GB pruned 模型) | 最低8GB显存&8GB显存 | 和官方比较接近 | 适合出图用 |
| Naifu (7GB latest模型) | 最低8GB显存(向上浮动10GB) | 和官方比较接近 | 适合出图或训练用 |
- 注意这里显存指的是512X512尺寸,默认配置下,出图时软件所需要占用的显存。2GB显存起步,意味浙你电脑显卡实际显存最少也要3GB(因为系统桌面,浏览器的显示也需要占用一部分显存)
- 通过增加各种“优化”参数,可以通过性能的部分下降换取显存占用减少。
- Nafu模型名称说明1:animefull-final-pruned = full-latest = NAI 全量模型(包含NSFW)
- Nafu模型名称说明2:animesfw-latest = NAI 基线模型
下载stable-diffusion
下载的方式有 3 个
- 官网下载:https://huggingface.co/CompVis/stable-diffusion-v-1-4-original
-
File storage:https://drive.yerf.org/wl/?id=EBfTrmcCCUAGaQBXVIj5lJmEhjoP1tgl
-
磁力链接
magnet:?xt=urn:btih:3a4a612d75ed088ea542acac52f9f45987488d1c&dn=sd-v1-4.ckpt&tr=udp%3a%2f%2ftracker.openbittorrent.com%3a6969%2fannounce&tr=udp%3a%2f%2ftracker.opentrackr.org%3a1337 -
将解压出.ckpt文件放在
\stable-diffusion-webui\models\Stable-diffusion\下
文件名可以是任何你喜欢的英文名。比如stable-diffusion .ckpt
下载 waifu-diffusion
-
官网下载:https://huggingface.co/hakurei/waifu-diffusion-v1-3/tree/main
-
下那个
wd-v1-3-float16.ckpt就行 -
将解压出.ckpt文件放在
\stable-diffusion-webui\models\Stable-diffusion\下
文件名可以是任何你喜欢的英文名.比如waifu-diffusion-16.ckpt
下载 NovelAILeaks
-
Naifu Leaks 4chan:https://pub-2fdef7a2969f43289c42ac5ae3412fd4.r2.dev/naifu.tar
-
Naifu Leaks animefull-latest:https://pub-2fdef7a2969f43289c42ac5ae3412fd4.r2.dev/animefull-latest.tar
-
找到
naifu\models\animefull-final-pruned\model.ckpt放在\stable-diffusion-webui\models\Stable-diffusion\下文件名可以是任何你喜欢的英文名,比如Naifu-Leaks- 4chan.ckpt -
找到
naifu\models\animefull-final-pruned\config.yaml放在\stable-diffusion-webui\models\Stable-diffusion\下文件名改成上边和你上边的文件同名,比如Naifu-Leaks- 4chan.yaml -
找到
naifu\modules\,把里面所有的.pt文件复制到\stable-diffusion-webui\models\hypernetworks\文件夹下,没有这个文件夹就自己新建一个。
下载其他模型
出于篇幅问题,其他常见的绘画用模型请参考另一篇文章
《AI 绘画与作画 stable diffusion webui 常见模型汇总及简介》
运行
- 双击运行
\stable-diffusion-webui\webui-user.bat -
耐心等待,脚本会自己检查依赖,会下载大约几个G的东西,解压安装到文件夹内(视网速不同,可能需要20分钟~2小时不等)无论看起来是不是半天没变化,感觉像卡住了,或者你发现电脑也没下载东西,窗口也没变化。千万不要关闭这个黑乎乎的CMD窗口,只要窗口最下方没显示类似“按任意键关闭窗口”的话,那脚本就是依然在正常运行的。
绝大部分情况下,这个阶段出现报错都是因为你的git与python访问国际互联网时遇到障碍所导致的,比如类似Couldn’t checkout commit,Recv failure: Connection was reset,Proxy URL had no scheme, should start with http:// or https://的提示。
- 当你看到下图这行字的时候,就是安装成功了
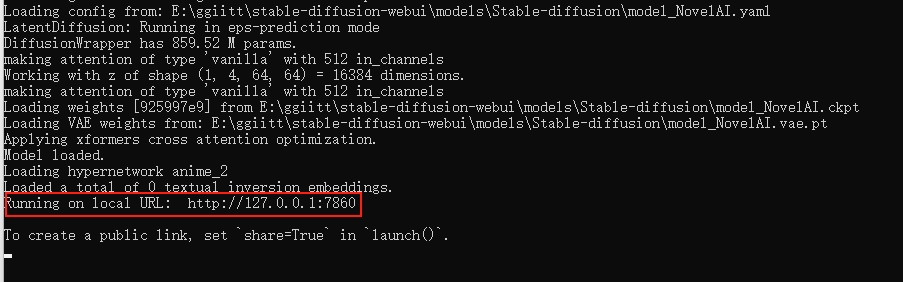
-
复制到浏览器访问即可(默认是 http://127.0.0.1:7860 )(注意不要关闭这个窗口,关闭就退出了)
生成第一张AI作图
这里只是简单说一下,稍微详细一点的教程请看另一篇文章:《AI绘画指南 (SD webui)如何设置与使用》
- Prompt 里填写想要的特征点
(((masterpiece))),((best quality)), flat chest,((loli)),((one girl)),very long light white hair, beautiful detailed red eyes,aqua eyes,white robe, cat ears,(flower hairpin),sunlight, light smile,blue necklace,see-through,
以上大概意思就是
杰作,最佳品质,贫乳,萝莉,1个女孩,很长的头发,淡白色头发,红色眼睛,浅绿色眼睛,白色长裙,猫耳,发夹,阳光下,淡淡的微笑,蓝色项链,透明
- Negative prompt 里填不想要的特征点
((part of the head)), ((((mutated hands and fingers)))), deformed, blurry, bad anatomy, disfigured, poorly drawn face, mutation, mutated, extra limb, ugly, poorly drawn hands, missing limb, blurry, floating limbs, disconnected limbs, malformed hands, blur, out of focus, long neck, long body, Octane renderer,lowres, bad anatomy, bad hands, text, missing fingers, worst quality, low quality, normal quality, signature, watermark, blurry,ugly, fat, obese, chubby, (((deformed))), [blurry], bad anatomy, disfigured, poorly drawn face, mutation, mutated, (extra_limb), (ugly), (poorly drawn hands), messy drawing,(2girls), morbid, mutilated, tranny, trans, trannsexual, [out of frame], (bad proportions), octane render, unity, unreal, maya, photorealistic
大概意思就是排除一些负面标签,比如奇怪的手,奇怪的肢体,减少生成奇怪图片的几率 -
Sampling Steps 你可以理解让AI推演多少步,一般来说超过17基本就能看了,步数越多,画面中的细节就越多,但需要的时间也就越久,一般20~30是一个比较稳妥的设定。这个数不会改变画面内容,只会让内容更加精细,比如20的项链就是一个心形钻石,而50的项链还是同样的心形钻石,只是钻石上会有更加复杂的线条
-
Sampling method 你可以理解成AI推演的算法,一般Euler a,Euler ,DDIM,都是不错的,任选一个就行。
-
图片分辨率 这个就是拼显卡显存的,自己调吧,低于512X512可能画面就不会有太多细节了,越大的分辨率AI能发挥的地方就越多。
-
下边是3个扩展选项,一般不需要勾选。
Restore faces:勾选后可以生成更真实的脸,第一次勾选使用时,需要先下载几个G的运行库。
Tiling:让图片可以平铺(类似瓷砖,生成的图案左右上下都可以无缝衔接上自己)
Highres. fix:超分辨率,让AI用更高的分辨率填充内容,但生成的最终尺寸还是你上边设定的尺寸。 -
生成几次,每次多少张
Batch count:是一次运行几次
Batch size: 是同时生成多少张
比如:Batch count设置为4,用时N分钟*4,生成4张图;Batch count设置为4,用时N分钟,生成4张图,但是同时需要的显存也是4倍。512X512大概需要3.75GB显存,4倍就是15GB显存了。
- CFG Scale AI有多参考你的Prompt与Negative prompt
开得越高,AI越严格按照你的设定走,但也会有越少的创意
开的越低,AI就越放飞自我,随心所欲的画。
一般7左右就行。 -
Seed 随机数种子,AI作画从原理上其实就是用一个随机的噪声图,反推回图像。但因为计算机里也没有真随机嘛,所以实际上,AI作画的起始噪声,是可以量化为一个种子数的。
-
Generate 开始干活按钮,这个就不用说了吧,点了AI就开始干活了。
-
Stable Diffusion checkpoint 在最左上角,是选择模型的,前边让你下载了三个,请根据自己需求和体验自行选择使用。
后话
-
使用NovelAILeaks模型,有一个额外的设置,请在页面中选择【settings选项卡】,把页面往下拉到底,找到setting CLIP stop at last layers(Clip 跳过层),把他设置为2
-
AI作图不是释放魔法,不是魔咒越长施法前摇越长的魔咒威力就越大。请简洁、准确、详细的描述你需要的Prompt即可。像我上边的要求就是,1个萝莉,穿白色连衣裙,瞳孔红色,长发,白色,带发卡,猫耳,微笑,阳光下。半透明材质衣服,已经WebUI是有75个词限制的。
-
如果你想生成更大尺寸的图,但是显卡显存不足
用文本编辑器打开\stable-diffusion-webui\webui-user.bat。
在COMMANDLINE_ARGS=后添加–medvram
如果还不行,改成–medvram –xformers
如果还不行,改成–medvram –opt-split-attention –xformers
如果还不行,改成–lowvram
如果还不行,改成–lowvram –xformers
如果还不行,改成–lowvram –opt-split-attention
注意这是个用生成时间换图片尺寸的事情,最极端的参数可能导致你图片生成时间是之前的好几倍。
最极端参数是个什么概念呢,比如默认配置512X512一张图是10秒内,但显存需要4G,改成最极端配置,显存仅需0.5~0.7G(和Sampling method有关),但代价是时长变成3分钟。
- 16XX系显卡,需要用文本编辑器打开\stable-diffusion-webui\webui-user.bat。
在COMMANDLINE_ARGS=后添加–precision full –no-half
类似下边这样,不然生成图会是黑块或者绿块,这是个16XX系显卡的bug
@echo off

set PYTHON=
set GIT=
set VENV_DIR=
set COMMANDLINE_ARGS=---precision full --no-half

call webui.bat
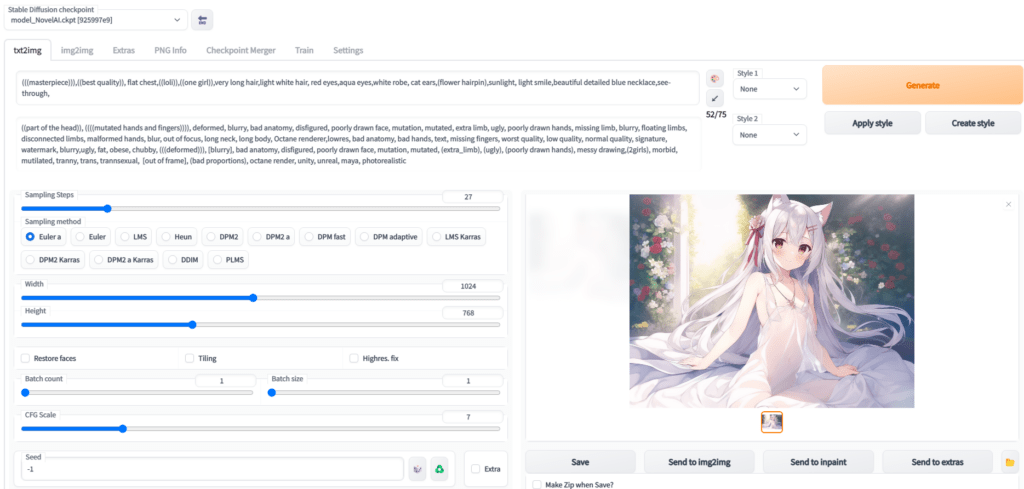
- 示意图中tag如下,理论上只要参数完全一致,就可以复现出一样的画(仅些微细节不同)
Stable Diffusion checkpoint:NovelAILeaks 4chan[925997e9]
prompt:
(((masterpiece))),((best quality)), flat chest,((loli)),((one girl)),very long hair,light white hair, red eyes,aqua eyes,white robe, cat ears,(flower hairpin),sunlight, light smile,beautiful detailed blue necklace,see-through,
Negative prompt: ((part of the head)), ((((mutated hands and fingers)))), deformed, blurry, bad anatomy, disfigured, poorly drawn face, mutation, mutated, extra limb, ugly, poorly drawn hands, missing limb, blurry, floating limbs, disconnected limbs, malformed hands, blur, out of focus, long neck, long body, Octane renderer,lowres, bad anatomy, bad hands, text, missing fingers, worst quality, low quality, normal quality, signature, watermark, blurry,ugly, fat, obese, chubby, (((deformed))), [blurry], bad anatomy, disfigured, poorly drawn face, mutation, mutated, (extra_limb), (ugly), (poorly drawn hands), messy drawing,(2girls), morbid, mutilated, tranny, trans, trannsexual, [out of frame], (bad proportions), octane render, unity, unreal, maya, photorealistic
Steps: 27, S
ampler: Euler a,
CFG scale: 7,
Seed: 2413789891,
Size: 1024x768,
Model hash: 925997e9,
Clip skip: 2
-
如果你想了解AI绘画的原理,这里有一篇不错的文章:学习AI绘画,从Diffusion和CLIP开始
-
如果你自身硬件性能不足,想要购买租用GPU机器,可以看一下这篇文章的这部分《常见云 GPU 介绍》

dipp
2023-03-26 19:32
ERROR: Exception:
Traceback (most recent call last):
File “C:\Users\20030902ybx\stable-diffusion-webui\venv\lib\site-packages\pip_vendor\urllib3\response.py”, line 438, in _error_catcher
yield
File “C:\Users\20030902ybx\stable-diffusion-webui\venv\lib\site-packages\pip_vendor\urllib3\response.py”, line 561, in read
data = self._fp_read(amt) if not fp_closed else b””
File “C:\Users\20030902ybx\stable-diffusion-webui\venv\lib\site-packages\pip_vendor\urllib3\response.py”, line 527, in _fp_read
return self._fp.read(amt) if amt is not None else self._fp.read()
File “C:\Users\20030902ybx\stable-diffusion-webui\venv\lib\site-packages\pip_vendor\cachecontrol\filewrapper.py”, line 90, in read
data = self.__fp.read(amt)
File “C:\Users\20030902ybx\AppData\Local\Programs\Python\Python310\lib\http\client.py”, line 465, in read
s = self.fp.read(amt)
File “C:\Users\20030902ybx\AppData\Local\Programs\Python\Python310\lib\socket.py”, line 705, in readinto
return self._sock.recv_into(b)
File “C:\Users\20030902ybx\AppData\Local\Programs\Python\Python310\lib\ssl.py”, line 1274, in recv_into
return self.read(nbytes, buffer)
File “C:\Users\20030902ybx\AppData\Local\Programs\Python\Python310\lib\ssl.py”, line 1130, in read
return self._sslobj.read(len, buffer)
TimeoutError: The read operation timed out
During handling of the above exception, another exception occurred:
Traceback (most recent call last):
File “C:\Users\20030902ybx\stable-diffusion-webui\venv\lib\site-packages\pip_internal\cli\base_command.py”, line 160, in exc_logging_wrapper
status = run_func(*args)
File “C:\Users\20030902ybx\stable-diffusion-webui\venv\lib\site-packages\pip_internal\cli\req_command.py”, line 247, in wrapper
return func(self, options, args)
File “C:\Users\20030902ybx\stable-diffusion-webui\venv\lib\site-packages\pip_internal\commands\install.py”, line 419, in run
requirement_set = resolver.resolve(
File “C:\Users\20030902ybx\stable-diffusion-webui\venv\lib\site-packages\pip_internal\resolution\resolvelib\resolver.py”, line 92, in resolve
result = self._result = resolver.resolve(
File “C:\Users\20030902ybx\stable-diffusion-webui\venv\lib\site-packages\pip_vendor\resolvelib\resolvers.py”, line 481, in resolve
state = resolution.resolve(requirements, max_rounds=max_rounds)
File “C:\Users\20030902ybx\stable-diffusion-webui\venv\lib\site-packages\pip_vendor\resolvelib\resolvers.py”, line 348, in resolve
self._add_to_criteria(self.state.criteria, r, parent=None)
File “C:\Users\20030902ybx\stable-diffusion-webui\venv\lib\site-packages\pip_vendor\resolvelib\resolvers.py”, line 172, in _add_to_criteria
if not criterion.candidates:
File “C:\Users\20030902ybx\stable-diffusion-webui\venv\lib\site-packages\pip_vendor\resolvelib\structs.py”, line 151, in bool
return bool(self._sequence)
File “C:\Users\20030902ybx\stable-diffusion-webui\venv\lib\site-packages\pip_internal\resolution\resolvelib\found_candidates.py”, line 155, in bool
return any(self)
File “C:\Users\20030902ybx\stable-diffusion-webui\venv\lib\site-packages\pip_internal\resolution\resolvelib\found_candidates.py”, line 143, in
return (c for c in iterator if id(c) not in self._incompatible_ids)
File “C:\Users\20030902ybx\stable-diffusion-webui\venv\lib\site-packages\pip_internal\resolution\resolvelib\found_candidates.py”, line 47, in _iter_built
candidate = func()
File “C:\Users\20030902ybx\stable-diffusion-webui\venv\lib\site-packages\pip_internal\resolution\resolvelib\factory.py”, line 206, in _make_candidate_from_link
self._link_candidate_cache[link] = LinkCandidate(
File “C:\Users\20030902ybx\stable-diffusion-webui\venv\lib\site-packages\pip_internal\resolution\resolvelib\candidates.py”, line 297, in init
super().init(
File “C:\Users\20030902ybx\stable-diffusion-webui\venv\lib\site-packages\pip_internal\resolution\resolvelib\candidates.py”, line 162, in init
self.dist = self._prepare()
File “C:\Users\20030902ybx\stable-diffusion-webui\venv\lib\site-packages\pip_internal\resolution\resolvelib\candidates.py”, line 231, in _prepare
dist = self._prepare_distribution()
File “C:\Users\20030902ybx\stable-diffusion-webui\venv\lib\site-packages\pip_internal\resolution\resolvelib\candidates.py”, line 308, in _prepare_distribution
return preparer.prepare_linked_requirement(self._ireq, parallel_builds=True)
File “C:\Users\20030902ybx\stable-diffusion-webui\venv\lib\site-packages\pip_internal\operations\prepare.py”, line 491, in prepare_linked_requirement
return self._prepare_linked_requirement(req, parallel_builds)
File “C:\Users\20030902ybx\stable-diffusion-webui\venv\lib\site-packages\pip_internal\operations\prepare.py”, line 536, in _prepare_linked_requirement
local_file = unpack_url(
File “C:\Users\20030902ybx\stable-diffusion-webui\venv\lib\site-packages\pip_internal\operations\prepare.py”, line 166, in unpack_url
file = get_http_url(
File “C:\Users\20030902ybx\stable-diffusion-webui\venv\lib\site-packages\pip_internal\operations\prepare.py”, line 107, in get_http_url
from_path, content_type = download(link, temp_dir.path)
File “C:\Users\20030902ybx\stable-diffusion-webui\venv\lib\site-packages\pip_internal\network\download.py”, line 147, in call
for chunk in chunks:
File “C:\Users\20030902ybx\stable-diffusion-webui\venv\lib\site-packages\pip_internal\cli\progress_bars.py”, line 53, in _rich_progress_bar
for chunk in iterable:
File “C:\Users\20030902ybx\stable-diffusion-webui\venv\lib\site-packages\pip_internal\network\utils.py”, line 63, in response_chunks
for chunk in response.raw.stream(
File “C:\Users\20030902ybx\stable-diffusion-webui\venv\lib\site-packages\pip_vendor\urllib3\response.py”, line 622, in stream
data = self.read(amt=amt, decode_content=decode_content)
File “C:\Users\20030902ybx\stable-diffusion-webui\venv\lib\site-packages\pip_vendor\urllib3\response.py”, line 560, in read
with self._error_catcher():
File “C:\Users\20030902ybx\AppData\Local\Programs\Python\Python310\lib\contextlib.py”, line 153, in exit
self.gen.throw(typ, value, traceback)
File “C:\Users\20030902ybx\stable-diffusion-webui\venv\lib\site-packages\pip_vendor\urllib3\response.py”, line 443, in _error_catcher
raise ReadTimeoutError(self._pool, None, “Read timed out.”)
pip._vendor.urllib3.exceptions.ReadTimeoutError: HTTPSConnectionPool(host=’download.pytorch.org’, port=443): Read timed out.
ACG555
2023-03-26 01:59
感谢大佬提供的教程,参考大佬的教程成功在本地部署了,中途也遇到了些坑,主要还是网络问题,就像评论区的各位小伙伴不是这个下不了就是那个下不了,解决的办法就是配置好全局魔法:)
paang
2023-03-24 19:33
你好,我早之前装的py311版本+path,现在卸载了311安装310并添加path,运行sd.bat还是提示
No Python at ‘”C:\Users\Administrator\AppData\Local\Programs\Python\Python311\python.exe’
怎么解决?
Horo
2023-03-20 20:32
Installing gfpgan
Traceback (most recent call last):
File “E:\Art\AI\stable-diffusion-webui\launch.py”, line 380, in
prepare_environment()
File “E:\Art\AI\stable-diffusion-webui\launch.py”, line 290, in prepare_environment
run_pip(f”install {gfpgan_package}”, “gfpgan”)
File “E:\Art\AI\stable-diffusion-webui\launch.py”, line 145, in run_pip
return run(f'”{python}” -m pip {args} –prefer-binary{index_url_line}’, desc=f”Installing {desc}”, errdesc=f”Couldn’t install {desc}”)
File “E:\Art\AI\stable-diffusion-webui\launch.py”, line 113, in run
raise RuntimeError(message)
RuntimeError: Couldn’t install gfpgan.
Command: “E:\Art\AI\stable-diffusion-webui\venv\Scripts\python.exe” -m pip install git+https://github.com/TencentARC/GFPGAN.git@8d2447a2d918f8eba5a4a01463fd48e45126a379 –prefer-binary
Error code: 1
stdout: Collecting git+https://github.com/TencentARC/GFPGAN.git@8d2447a2d918f8eba5a4a01463fd48e45126a379
Cloning https://github.com/TencentARC/GFPGAN.git (to revision 8d2447a2d918f8eba5a4a01463fd48e45126a379) to c:\users\holo\appdata\local\temp\pip-req-build-pgk8_o54
stderr: Running command git clone –filter=blob:none –quiet https://github.com/TencentARC/GFPGAN.git ‘C:\Users\HOLO\AppData\Local\Temp\pip-req-build-pgk8_o54’
error: RPC failed; curl 28 Recv failure: Connection was reset
fatal: expected flush after ref listing
error: subprocess-exited-with-error
git clone –filter=blob:none –quiet https://github.com/TencentARC/GFPGAN.git ‘C:\Users\HOLO\AppData\Local\Temp\pip-req-build-pgk8_o54’ did not run successfully.
exit code: 128
See above for output.
note: This error originates from a subprocess, and is likely not a problem with pip.
大佬,这是git上的下不到c盘吗?咋解决啊
去年夏天
2023-03-20 20:48
简而言之就是git clone 无法访问github上的代码,网络连接错误。
给git和python加上代理吧,具体步骤谷歌一下就有。
Horo
2023-03-20 20:55
大佬,为什么一定要手动设置git代理呢?为啥用工具走全局代理也不能下载git上代码呢?是因为节点不好吗还是其他原因?
去年夏天
2023-03-20 21:04
因为这个“全局”是指的经过浏览器的流量全局,不是电脑上的全部流量。
除非你开启VPN模式(V2ng),tun(clash for win)模式等真·全局模式
Horo
2023-03-20 21:17
明白了,感谢大佬解答,设了代理问题也成功解决了
xysDavid
2023-03-20 01:05
$ ./webui-user.bat
venv “D:\stable-diffusion-webui\venv\Scripts\Python.exe”
Python 3.10.6 (tags/v3.10.6:9c7b4bd, Aug 1 2022, 21:53:49) [MSC v.1932 64 bit (AMD64)]
Commit hash: a9fed7c364061ae6efb37f797b6b522cb3cf7aa2
Installing requirements for Web UI
Launching Web UI with arguments:
Traceback (most recent call last):
File “D:\stable-diffusion-webui\launch.py”, line 381, in
start()
File “D:\stable-diffusion-webui\launch.py”, line 372, in start
import webui
File “D:\stable-diffusion-webui\webui.py”, line 28, in
from modules import extra_networks, ui_extra_networks_checkpoints
File “D:\stable-diffusion-webui\modules\ui_extra_networks_checkpoints.py”, line 5, in
from modules import shared, ui_extra_networks, sd_models
File “D:\stable-diffusion-webui\modules\shared.py”, line 12, in
import modules.interrogate
File “D:\stable-diffusion-webui\modules\interrogate.py”, line 15, in
from modules import devices, paths, shared, lowvram, modelloader, errors
File “D:\stable-diffusion-webui\modules\modelloader.py”, line 7, in
from basicsr.utils.download_util import load_file_from_url
File “D:\stable-diffusion-webui\venv\lib\site-packages\basicsr__init__.py”, line 3, in
from .archs import *
File “D:\stable-diffusion-webui\venv\lib\site-packages\basicsr\archs__init__.py”, line 16, in
_arch_modules = [importlib.import_module(f’basicsr.archs.{file_name}’) for file_name in arch_filenames]
File “D:\stable-diffusion-webui\venv\lib\site-packages\basicsr\archs__init__.py”, line 16, in
_arch_modules = [importlib.import_module(f’basicsr.archs.{file_name}’) for file_name in arch_filenames]
File “C:\Users\Administrator\AppData\Local\Programs\Python\Python310\lib\importlib__init__.py”, line 126, in import_module
return _bootstrap._gcd_import(name[level:], package, level)
File “D:\stable-diffusion-webui\venv\lib\site-packages\basicsr\archs\basicvsrpp_arch.py”, line 7, in
from basicsr.archs.arch_util import flow_warp
File “D:\stable-diffusion-webui\venv\lib\site-packages\basicsr\archs\arch_util.py”, line 13, in
from basicsr.ops.dcn import ModulatedDeformConvPack, modulated_deform_conv
ModuleNotFoundError: No module named ‘basicsr.ops’
Press any key to continue . . .
博主你好,我跑完之后发现这堆提示,要怎么处理呢
去年夏天
2023-03-20 19:56
大概意思就是没有找到“basicsr.ops”模块。尝试更新一下代码再运行,
关关
2023-03-18 20:17
venv “E:\AI\stable-diffusion-webui\venv\Scripts\Python.exe”
Python 3.10.6 (tags/v3.10.6:9c7b4bd, Aug 1 2022, 21:53:49) [MSC v.1932 64 bit (AMD64)]
Commit hash: a9fed7c364061ae6efb37f797b6b522cb3cf7aa2
Installing torch and torchvision
E:\AI\stable-diffusion-webui\venv\Scripts\python.exe: No module named pip
Traceback (most recent call last):
File “E:\AI\stable-diffusion-webui\launch.py”, line 380, in
prepare_environment()
File “E:\AI\stable-diffusion-webui\launch.py”, line 284, in prepare_environment
run(f'”{python}” -m {torch_command}’, “Installing torch and torchvision”, “Couldn’t install torch”, live=True)
File “E:\AI\stable-diffusion-webui\launch.py”, line 97, in run
raise RuntimeError(f”””{errdesc or ‘Error running command’}.
RuntimeError: Couldn’t install torch.
Command: “E:\AI\stable-diffusion-webui\venv\Scripts\python.exe” -m pip install torch1.13.1+cu117 torchvision0.14.1+cu117 –extra-index-url https://download.pytorch.org/whl/cu117
Error code: 1
请按任意键继续. . .
大神,这是啥情况?
去年夏天
2023-03-20 19:53
在CMD里运行一下
python -m ensurepip试试?关关
2023-03-21 07:55
E:\AI\stable-diffusion-webui>python -m ensurepip
Looking in links: c:\Users\ADMINI~1\AppData\Local\Temp\tmprjai6wwo
Requirement already satisfied: setuptools in c:\users\administrator\appdata\local\programs\python\python310\lib\site-packages (63.2.0)
Requirement already satisfied: pip in c:\users\administrator\appdata\local\programs\python\python310\lib\site-packages (23.0.1)
运行之后出来这个,但是运行webui.bat还是跟之前提示一样的错误
杠9
2023-03-22 22:36
我也是这样的问题
出现这个问题是怎么回事了
2023-03-16 21:41
Already up to date.
venv “E:\SDAI\stable-diffusion-webui\venv\Scripts\Python.exe”
Python 3.10.6 (tags/v3.10.6:9c7b4bd, Aug 1 2022, 21:53:49) [MSC v.1932 64 bit (AMD64)]
Commit hash: a9fed7c364061ae6efb37f797b6b522cb3cf7aa2
Fetching updates for Taming Transformers…
Checking out commit for Taming Transformers with hash: 24268930bf1dce879235a7fddd0b2355b84d7ea6…
Traceback (most recent call last):
File “E:\SDAI\stable-diffusion-webui\launch.py”, line 380, in
prepare_environment()
File “E:\SDAI\stable-diffusion-webui\launch.py”, line 316, in prepare_environment
git_clone(taming_transformers_repo, repo_dir(‘taming-transformers’), “Taming Transformers”, taming_transformers_commit_hash)
File “E:\SDAI\stable-diffusion-webui\launch.py”, line 164, in git_clone
run(f'”{git}” -C “{dir}” checkout {commithash}’, f”Checking out commit for {name} with hash: {commithash}…”, f”Couldn’t checkout commit {commithash} for {name}”)
File “E:\SDAI\stable-diffusion-webui\launch.py”, line 113, in run
raise RuntimeError(message)
RuntimeError: Couldn’t checkout commit 24268930bf1dce879235a7fddd0b2355b84d7ea6 for Taming Transformers.
Command: “git” -C “E:\SDAI\stable-diffusion-webui\repositories\taming-transformers” checkout 24268930bf1dce879235a7fddd0b2355b84d7ea6
Error code: 128
stdout:
stderr: fatal: reference is not a tree: 24268930bf1dce879235a7fddd0b2355b84d7ea6
去年夏天
2023-03-17 02:01
你这个还挺神奇的,为Taming Transformers仓库检出特定的提交哈希时遇到了错误。是什么鬼情况?你过一会儿重试试试?感觉不是你的问题。
opopokk
2023-03-16 00:17
[notice] A new release of pip available: 22.2.1 -> 23.0.1
[notice] To update, run: D:\aizitu\stable-diffusion-webui\venv\Scripts\python.exe -m pip install –upgrade pip
大神,这个该如何解决掉,已经重复安装一晚上了
去年夏天
2023-03-16 06:23
看报错,是需要升级pip版本。
运行
D:\aizitu\stable-diffusion-webui\run.bat时,升级应该会自动完成的。或者尝试进入
D:\aizitu\stable-diffusion-webui\venv\Scripts\目录,在资源管理器地址栏输入cmd回车,调出命令提示行。命令提示行内输入
pip install –upgrade pip回车试试。Alen
2023-03-21 20:21
我跟你一样,富强网络改成全局再下载就OK了
lee
2023-03-15 20:07
fatal: unable to access ‘https://github.com/AUTOMATIC1111/stable-diffusion-webui.git/’: Failed to connect to 127.0.0.1 port 31181 after 2031 ms: Couldn’t connect to server
venv “VENV\Scripts\Python.exe”
Python 3.10.6 (tags/v3.10.6:9c7b4bd, Aug 1 2022, 21:53:49) [MSC v.1932 64 bit (AMD64)]
Commit hash: a9fed7c364061ae6efb37f797b6b522cb3cf7aa2
Fetching updates for Stable Diffusion…
Traceback (most recent call last):
File “E:\AI\stable-diffusion-webui\launch.py”, line 380, in
prepare_environment()
File “E:\AI\stable-diffusion-webui\launch.py”, line 315, in prepare_environment
git_clone(stable_diffusion_repo, repo_dir(‘stable-diffusion-stability-ai’), “Stable Diffusion”, stable_diffusion_commit_hash)
File “E:\AI\stable-diffusion-webui\launch.py”, line 163, in git_clone
run(f'”{git}” -C “{dir}” fetch’, f”Fetching updates for {name}…”, f”Couldn’t fetch {name}”)
File “E:\AI\stable-diffusion-webui\launch.py”, line 113, in run
raise RuntimeError(message)
RuntimeError: Couldn’t fetch Stable Diffusion.
Command: “git” -C “E:\AI\stable-diffusion-webui\repositories\stable-diffusion-stability-ai” fetch
Error code: 128
stdout:
stderr: fatal: unable to access ‘https://github.com/AUTOMATIC1111/stable-diffusion-webui.git/’: Failed to connect to 127.0.0.1 port 31181 after 2087 ms: Couldn’t connect to server
Press any key to continue . . .
就教,为什么一直显示无法打开,网站我可以正常登录
去年夏天
2023-03-15 20:37
就是连接本地代理127.0.0.1:31181超时
Otto
2023-03-08 17:03
[notice] A new release of pip available: 22.2.1 -> 23.0.1
[notice] To update, run: E:\AI artist\stable-diffusion-webui\venv\Scripts\python.exe -m pip install –upgrade pip
Installing gfpgan
Installing clip
Traceback (most recent call last):
File “E:\AI artist\stable-diffusion-webui\launch.py”, line 360, in
prepare_environment()
File “E:\AI artist\stable-diffusion-webui\launch.py”, line 278, in prepare_environment
run_pip(f”install {clip_package}”, “clip”)
File “E:\AI artist\stable-diffusion-webui\launch.py”, line 137, in run_pip
return run(f'”{python}” -m pip {args} –prefer-binary{index_url_line}’, desc=f”Installing {desc}”, errdesc=f”Couldn’t install {desc}”)
File “E:\AI artist\stable-diffusion-webui\launch.py”, line 105, in run
raise RuntimeError(message)
RuntimeError: Couldn’t install clip.
Command: “E:\AI artist\stable-diffusion-webui\venv\Scripts\python.exe” -m pip install git+https://github.com/openai/CLIP.git@d50d76daa670286dd6cacf3bcd80b5e4823fc8e1 –prefer-binary
Error code: 1
stdout: Collecting git+https://github.com/openai/CLIP.git@d50d76daa670286dd6cacf3bcd80b5e4823fc8e1
Cloning https://github.com/openai/CLIP.git (to revision d50d76daa670286dd6cacf3bcd80b5e4823fc8e1) to c:\users\caigu\appdata\local\temp\pip-req-build-cxyp4cj2
stderr: Running command git clone –filter=blob:none –quiet https://github.com/openai/CLIP.git ‘C:\Users\caigu\AppData\Local\Temp\pip-req-build-cxyp4cj2’
fatal: unable to access ‘https://github.com/openai/CLIP.git/’: Recv failure: Connection was reset
error: subprocess-exited-with-error
git clone –filter=blob:none –quiet https://github.com/openai/CLIP.git ‘C:\Users\caigu\AppData\Local\Temp\pip-req-build-cxyp4cj2’ did not run successfully.
exit code: 128
See above for output.
note: This error originates from a subprocess, and is likely not a problem with pip.
[notice] A new release of pip available: 22.2.1 -> 23.0.1
[notice] To update, run: E:\AI artist\stable-diffusion-webui\venv\Scripts\python.exe -m pip install –upgrade pip
前面代码跑着都正常 到后面就这样了 搞一天都不行 请问一下有人会解决吗
去年夏天
2023-03-09 09:47
两个情况
1. 用pip安装”clip”包时出现错误,原因是Git克隆失败。应该是由于网络连接问题。
2. 提醒可以更新pip版本到23.0.1,你可以运行这个命令升级
E:\AI artist\stable-diffusion-webui\venv\Scripts\python.exe -m pip install –upgrade pipUta
2023-03-09 19:38
第一个网络连接的问题要怎么处理啊?
去年夏天
2023-03-10 00:02
给git和python设置个代理
Uta
2023-03-14 08:36
解决方法:
1、Github配置ssh key:
https://blog.csdn.net/weixin_42310154/article/details/118340458
2、修改 Hosts 解决 Github 访问:
https://www.cnblogs.com/jiayouba/p/15602175.html
3、再次启动后,下载Open Clip失败:直接在cmd中运行:”E:\AI_art\SD_WebUI\venv\Scripts\python.exe” -m pip install git+https://gitee.com/ufhy/open_clip.git@bb6e834e9c70d9c27d0dc3ecedeebeaeb1ffad6b –prefer-binary 即可(需做好目录的替换)参考:https://www.bilibili.com/read/cv21253533
4、再次启动后,记得关FQ,则运行成功
Kimo7
2023-02-28 06:13
venv “F:\stable-diffusion-webui-master_3\venv\Scripts\Python.exe”
Python 3.10.8 (tags/v3.10.8:aaaf517, Oct 11 2022, 16:50:30) [MSC v.1933 64 bit (AMD64)]
Commit hash:
Traceback (most recent call last):
File “F:\stable-diffusion-webui-master_3\launch.py”, line 360, in
prepare_environment()
File “F:\stable-diffusion-webui-master_3\launch.py”, line 272, in prepare_environment
run_python(“import torch; assert torch.cuda.is_available(), ‘Torch is not able to use GPU; add –skip-torch-cuda-test to COMMANDLINE_ARGS variable to disable this check'”)
File “F:\stable-diffusion-webui-master_3\launch.py”, line 129, in run_python
return run(f'”{python}” -c “{code}”‘, desc, errdesc)
File “F:\stable-diffusion-webui-master_3\launch.py”, line 105, in run
raise RuntimeError(message)
RuntimeError: Error running command.
Command: “F:\stable-diffusion-webui-master_3\venv\Scripts\python.exe” -c “import torch; assert torch.cuda.is_available(), ‘Torch is not able to use GPU; add –skip-torch-cuda-test to COMMANDLINE_ARGS variable to disable this check'”
Error code: 1
stdout:
stderr: Traceback (most recent call last):
File “”, line 1, in
AssertionError: Torch is not able to use GPU; add –skip-torch-cuda-test to COMMANDLINE_ARGS variable to disable this check
请按任意键继续. . .
大佬,这种该怎么解决啊
cqfamas
2023-03-10 17:59
显卡驱动太老了,CPU torch和CUDA版本不匹配
emmmm
2023-02-22 21:41
想知道ckpt文件这些训练模型怎么弄出来的,机器学习,python啥的吗,想找个教程,有推荐吗问下
去年夏天
2023-02-23 08:51
你可以看下这个StableDiffusionBook
小水
2023-02-21 15:59
运行BAT后
大佬帮帮看看怎么回事?venv “D:\Aitodraw\stable-diffusion-webui\venv\Scripts\Python.exe”
Python 3.10.6 (tags/v3.10.6:9c7b4bd, Aug 1 2022, 21:53:49) [MSC v.1932 64 bit (AMD64)]
Commit hash: 0cc0ee1bcb4c24a8c9715f66cede06601bfc00c8
Installing gfpgan
Traceback (most recent call last):
File “D:\Aitodraw\stable-diffusion-webui\launch.py”, line 360, in
prepare_environment()
File “D:\Aitodraw\stable-diffusion-webui\launch.py”, line 275, in prepare_environment
run_pip(f”install {gfpgan_package}”, “gfpgan”)
File “D:\Aitodraw\stable-diffusion-webui\launch.py”, line 137, in run_pip
return run(f'”{python}” -m pip {args} –prefer-binary{index_url_line}’, desc=f”Installing {desc}”, errdesc=f”Couldn’t install {desc}”)
File “D:\Aitodraw\stable-diffusion-webui\launch.py”, line 105, in run
raise RuntimeError(message)
RuntimeError: Couldn’t install gfpgan.
Command: “D:\Aitodraw\stable-diffusion-webui\venv\Scripts\python.exe” -m pip install git+https://github.com/TencentARC/GFPGAN.git@8d2447a2d918f8eba5a4a01463fd48e45126a379 –prefer-binary
Error code: 1
stdout: Collecting git+https://github.com/TencentARC/GFPGAN.git@8d2447a2d918f8eba5a4a01463fd48e45126a379
Cloning https://github.com/TencentARC/GFPGAN.git (to revision 8d2447a2d918f8eba5a4a01463fd48e45126a379) to c:\users\temp\appdata\local\temp\pip-req-build-7aff_wxc
stderr: Running command git clone –filter=blob:none –quiet https://github.com/TencentARC/GFPGAN.git ‘C:\Users\TEMP\AppData\Local\Temp\pip-req-build-7aff_wxc’
fatal: unable to access ‘https://github.com/TencentARC/GFPGAN.git/’: Recv failure: Connection was reset
error: subprocess-exited-with-error
git clone –filter=blob:none –quiet https://github.com/TencentARC/GFPGAN.git ‘C:\Users\TEMP\AppData\Local\Temp\pip-req-build-7aff_wxc’ did not run successfully.
exit code: 128
See above for output.
note: This error originates from a subprocess, and is likely not a problem with pip.
tree
2023-02-24 17:29
根据我的瞎摸索,你这个很大可能是网络问题,就是下不来git的东西,解决方法1是挂梯(要比较通畅的全局模式)2是打开项目下的Python.py文件找到啥内容加一个源进去。(你可以尝试搜索下“Python.py改git源”这种内容,就是在git网址前加一段网址)我回家以后看看能不能找到当时解决的链接。
墨
2023-02-19 13:37
1660ti,2023.2.19不需要更改就可以直接使用了
蜜雪冰城甜蜜蜜
2023-02-18 19:14
找了一下午b站,知乎的教程没弄好,看了你这篇,好家伙直接全弄好了
Net
2023-02-16 12:41
mac电脑可以吗
OMG
2023-02-25 03:40
Intel版的不行,m1和m2的机型有apple的魔法加持
OMG
2023-02-25 03:40
Intel版的只能靠CPU运算,用不了显卡
脩
2023-02-16 10:17
為什麼我Python 3.10.6安裝完輸入Python -V,出來是Python 3.9.10,有夠詭異@@
然後執行這個”python -m pip install –upgrade pip”就找不到
C:\Program Files\Inkscape\bin\python.exe: No module named pip
去年夏天
2023-02-16 11:25
情况1:装完3.10.6之后又装了3.9.10,同时选择了【Add Python to PATH】导致之前安装的3.10.6的环境被覆盖
情况2:先装的3.9.10,之后安装3.10.6时,没选【Add Python to PATH】导致环境变量还是之前3.9.10的。
nps努力
2023-02-11 23:30
运行bat文件报错
报错代码:RuntimeError: Couldn’t install gfpgan.
去年夏天
2023-02-16 11:29
从大家经验来说:1、反复运行,等待,运行,等待。可能自己就好了。2、删除整个stable-diffusion-webui文件夹,重新来一遍。
根源是网络不稳定导致的下载安装到一半失败。
ControlNet
2022-12-20 18:15
您好,我想要写一篇blog介绍一下ai绘画的原理,请问可以用一下这篇文章的第一张图片嘛?这张图应该是一张ai生成的图的吧。我的blog网站和要写的文章是纯粹非商业的,也不会有广告,而且会标注到这篇文章的引用。谢谢
去年夏天
2022-12-21 10:45
可以的,用吧
ControlNet
2022-12-19 20:59
博主您好,我最近想在自己的博客里写一些介绍ai绘画原理的文章,请问可以拿这篇文章的头图作为封面吗?整个blog和文章都是完全非商业非盈利无广告,并且会注明到这篇文章的引用。